こんにちは!最近業務でUNIX系を触ることが多いので、vimを使うようになりました。guiなくても、terminal上で動くので他のサーバにアクセスして書き換えるときに大変便利ですよね。
ただし、快適な作業をするために自分でプラグイン等を入れないといけないので、今回はプラグインのdeinを入れてみました。
コードはこちら。
https://github.com/Shougo/dein.vim
スポンサードサーチ
Requirements
仕様ですが、
- Vim 8.2 もしくはNeoVimであること
調べてみたら、8.1でしたので、アップグレードしました。~user@computer$ vim -version
VIM – Vi IMproved 8.1 (2018 May 18, compiled Feb 01 2022 09:16:32) Garbage after option argument: “-version”
~user@computer$ sudo apt update

sudo apt upgrade vim - xcopyのパスが通っていること、もしくはPython3が通っている子
- “git” のパスが通っていること
であることが必要です。
今回は私は Ubuntu 20.04 on WSLで試してみました。
スポンサードサーチ
始めに
deinを使用する際はインストールディレクトリを決めておく必要があります。今回は.~/.cache/deinにしておきます。
~user@computer$ mkdir -p ~/.cache/dein

cd ~/.cache/dein
次にインストールします
curl https://raw.githubusercontent.com/Shougo/dein.vim/master/bin/installer.sh > installer.sh

# For example, we just use ~/.cache/dein as installation directory

sh ./installer.sh ~/.cache/dein
実際のコマンドの様子はこのような感じ
curl https://raw.githubusercontent.com/Shougo/dein.vim/master/bin/installer.sh > installer.sh % Total % Received % Xferd Average Speed Time Time Time Current Dload Upload Total Spent Left Speed 100 2135 100 2135 0 0 8056 0 –:–:– –:–:– –:–:– 8026 initial@DESKTOP-QH475PH:~/.cache/deinuser@computer$ sh ./installer.sh ~/.cache/dein Install to “/home/initial/.cache/dein/repos/github.com/Shougo/dein.vim”… git is /usr/bin/git Begin fetching dein… Cloning into ‘/home/initial/.cache/dein/repos/github.com/Shougo/dein.vim’… remote: Enumerating objects: 64, done. remote: Counting objects: 100% (64/64), done.

remote: Compressing objects: 100% (53/53), done. remote: Total 64 (delta 1), reused 34 (delta 0), pack-reused 0 Receiving objects: 100% (64/64), 76.77 KiB | 524.00 KiB/s, done.

Resolving deltas: 100% (1/1), done. Done.

Please add the following settings for dein to the top of your vimrc (Vim) or init.vim (NeoVim) file:

“dein Scripts—————————–

if &compatible set nocompatible ” Be iMproved

endif

” Required: set runtimepath+=/home/initial/.cache/dein/repos/github.com/Shougo/dein.vim

” Required:

call dein#begin(‘/home/initial/.cache/dein’)

” Let dein manage dein

” Required: call

dein#add(‘/home/initial/.cache/dein/repos/github.com/Shougo/dein.vim’)

” Add or remove your plugins here like this:
“call dein#add(‘Shougo/neosnippet.vim’)
“call dein#add(‘Shougo/neosnippet-snippets’)

” Required:

call dein#end()

” Required:

filetype plugin indent on

syntax enable

” If you want to install not installed plugins on startup.

“if dein#check_install()

” call dein#install()

“endif

“End dein Scripts————————-

Done. Complete setup dein!
よくわからないけど、うまくセットアップできたと書いてありますね。
スポンサードサーチ
.vimrcを書き換えてみる
次にvimrcを下記の様に書き換えてみます。これは先ほどの実行結果に乗っていたものをコピペします

vim ~/.vimrcこれを張り付けた後にコメントアウトして、下記を実行します。
これでvimを開いたときにインストールさせるはずです。
こうすることで、vimを立ち上げた時に、まだ読み込んでいないプラグインがあれば、自動で読み込んでくれます。
jedi-vimをインストール
(1) jedi-vimのインストール
次に,jedi-vimをインストールします。
pip3 install –user jedi
(4)dein.vimでjedi-vimをVimに読み込ませる
赤字を追加してみましょう。これで、.vimrcを保存して閉じます。再度,vimを開くと、自動でvimがjedi-vimを読み込みます。
正しくインストールして、:help jedi-vimと入力すると
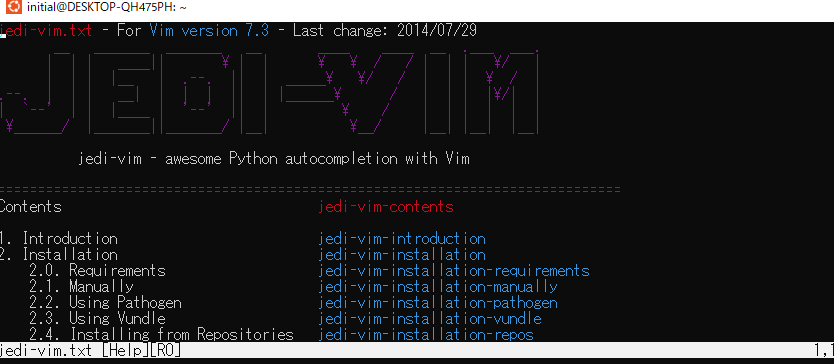
と表示されるはずです。適当に
vim test.pyで入力してみると補完できていることが分かります。

まとめ
今回はdeinについて導入した記事をまとめました。皆さんもぜひdeinを試してみてください。

コメントを残す